Showing posts with label before and after. Show all posts
Monday, May 28, 2012
From a Basement on the Hill: Prologue
Friends, parents, and other followers, lend me your eyes! A new project is afoot!
When I'm not teaching, digging in the dirt, or desperately trying to rewire an old light fixture, I'm an artist with my main studio in our basement.
Over the past year or so, I've become less and less in love with the closed off nature of this space. The false walls that break it up and block the front windows are just not working for me anymore. So, my summer project is to open up, clean up, and brighten up this space, starting tomorrow! Here's one last look at what came before:
Wednesday, February 8, 2012
Kitchen Conundrum: Fine in the Sunshine
This is not a grand reveal, as we still have several bits, pieces, odds, and ends to finish up or find homes for in the new kitchen. But first, remember this room?

Yeah, me neither; or, just barely. Because our Kitchen Conundrum has officially become our Kitchen Contentment. We love being in and using this room now, so much so that lately our refrigerator is bursting with leftovers from all the cooking we feel inspired to do! Here's a taste:


Yeah, me neither; or, just barely. Because our Kitchen Conundrum has officially become our Kitchen Contentment. We love being in and using this room now, so much so that lately our refrigerator is bursting with leftovers from all the cooking we feel inspired to do! Here's a taste:
Sunday, August 28, 2011
Goodnight Irene, Goodnight
Last night we survived our first hurricane (after living through a tropical depression or two while going to college in Houston). Here's what our preparation looked like:
We pulled all of our outdoor stuff (hand-me-down patio furniture, trash cans, grill, compost pails) under our back porch and piled sand bags against the basement door. Here's Mr. MJ sweeping up debris around the storm drain.
We also moved all of our container garden into the back porch.
Kind of looks like a makeshift green house. Otherwise, we battened down every hatch we could find and bought one of the last packs of D batteries in the city (seemingly), along with bread, cheese, crackers, and bottled water.
Our neighbors across the alley prepared by cutting down a big old catalpa tree in their back yard (if you squint you can see the worker strapped to the trunk; sad to see that one go...it made amazing looking seed pods). You can see the storm clouds moving in beyond the houses.
And this morning, we woke up to electricity and a dry house. Hurrah! We consider ourselves very lucky in this regard. Here's the tail end of Irene moving on out. I'll see you in my dreams, old girl!
We pulled all of our outdoor stuff (hand-me-down patio furniture, trash cans, grill, compost pails) under our back porch and piled sand bags against the basement door. Here's Mr. MJ sweeping up debris around the storm drain.
We also moved all of our container garden into the back porch.
Kind of looks like a makeshift green house. Otherwise, we battened down every hatch we could find and bought one of the last packs of D batteries in the city (seemingly), along with bread, cheese, crackers, and bottled water.
Our neighbors across the alley prepared by cutting down a big old catalpa tree in their back yard (if you squint you can see the worker strapped to the trunk; sad to see that one go...it made amazing looking seed pods). You can see the storm clouds moving in beyond the houses.
And this morning, we woke up to electricity and a dry house. Hurrah! We consider ourselves very lucky in this regard. Here's the tail end of Irene moving on out. I'll see you in my dreams, old girl!
Sunday, May 15, 2011
OMG, CRAZIEST project EVER (so far): Part 5
After I caulked the medallion to the ceiling, I removed the fixture (I had to leave it in place during the caulking for spacing and support) and painted the medallion and caulk to match the ceiling (Martha Stewart Glass of Milk in flat). I suppose it's a little more ornate than I might have chosen, but the acanthus leaf design is similar in shape to the scallop shell pattern on the glass globe of the light fixture. Whatever works!
In a few hours, my paint (2 coats) had dried, and I finally installed my light. Behold what 5 days of fiddling around (on a project that should have taken 5 hours) will get you:
For reference, here's what the foyer looked like before this change:
Pretty good, right? I *think* it was worth all the effort.
Friday, April 29, 2011
Dining Room, Now with (better) Light
You may remember from my last post that our dining room was starting to pull itself together, except for the off-center, too-high chandelier. After poking around on the Internet for about 20 minutes, I learned how to fix this blemish on my otherwise nice room.
I had to buy a long length (about 6 feet) of lamp wire (same thing the hardware store would sell you to rewire an old lamp), some chain, and a hook with a toggle bolt. I also needed a couple of pairs of pliers, and some help from my every-handy mom (it's so nice how she visits when I need to get something done!).
We got the chandelier rewired and put back together. Next, we drilled a (rather large) hole in the ceiling (made difficult by my lack of a half-inch drill bit) to fit our hook and toggle bolt. These are kind of fun when they go in easily, and frustrating when they don't.
Several hours later, we concluded our project with the beautiful vista below. Reattaching and correctly placing the chandelier was much more difficult that we expected; as we screwed the parts all back together, the long length of chain and wire became terribly twisted. However, the ours of having our arms in the air fooling with things above our heads were worth it. We can now see our food while we eat it! Hurrah!
Friday, April 22, 2011
Dining Room, Now with Color
One of the last spots in the house left to improve, that I could work on without hiring professionals or buying more equipment, was the dining room. I have cogitated on what to do with the dining room for a few months. Options I have considered are: stripping the wallpaper and reapplying new wallpaper, painting a pattern on the bare walls with a stencil, continuing the green from the living room into the dining room, painting the walls the gray from the entryway. I was really leaning towards this last option after seeing how great the gray looked with the wood and brick in the entryway.
But one thing I hadn't considered doing was leaving up the current textured wallpaper and giving it a fresh coat of paint. I mean, it's clear by now that I hate all things textured wallpaper, right? However, that textured paper in the dining room, with its swirly floral pattern, had begun to look more attractive after getting rid of all the texture in the rest of the house. We'd even gotten several compliments on it over the past few months. So I thought and rethought and finally decided to give it a try.
Here was the dining room this past Tuesday, after clearing out most of the furniture. It had that same dirty cream color that the rest of the house had when we moved in.

Here's my test swatch of the gray paint (Martha Stewart's Driftwood Gray in flat finish) on the old wallpaper. Since I have not painted the wallpaper before, I wanted to try out whether or not I would need a coat of primer underneath. Since the paper already had a coat or two of flat paint on it, I discovered that I could skip the primer step. (I also painted the dining room ceiling in the same Martha Stewart Glass of Milk white that I have used elsewhere. Once again, taking this step helps diminish the visual presence of the textured ceiling and makes everything seem fresh and clean.)

And here's the dining room on Thursday evening. The room isn't totally put back together yet, but it already feels more polished and considered. The new coat of paint makes the pattern of the paper more subtle, perhaps because the color is darker and the flat paint doesn't reflect any light. It has become an interesting detail instead of an overbearing focal point.

Here's a close up of the freshly painted wallpaper.

Another look at the new dining room. Now I just need to work on lowering and centering the light fixture, and I think we can call this room done. One more line scratched off my to-do list. Hurrah!
But one thing I hadn't considered doing was leaving up the current textured wallpaper and giving it a fresh coat of paint. I mean, it's clear by now that I hate all things textured wallpaper, right? However, that textured paper in the dining room, with its swirly floral pattern, had begun to look more attractive after getting rid of all the texture in the rest of the house. We'd even gotten several compliments on it over the past few months. So I thought and rethought and finally decided to give it a try.
Here was the dining room this past Tuesday, after clearing out most of the furniture. It had that same dirty cream color that the rest of the house had when we moved in.
Here's my test swatch of the gray paint (Martha Stewart's Driftwood Gray in flat finish) on the old wallpaper. Since I have not painted the wallpaper before, I wanted to try out whether or not I would need a coat of primer underneath. Since the paper already had a coat or two of flat paint on it, I discovered that I could skip the primer step. (I also painted the dining room ceiling in the same Martha Stewart Glass of Milk white that I have used elsewhere. Once again, taking this step helps diminish the visual presence of the textured ceiling and makes everything seem fresh and clean.)
And here's the dining room on Thursday evening. The room isn't totally put back together yet, but it already feels more polished and considered. The new coat of paint makes the pattern of the paper more subtle, perhaps because the color is darker and the flat paint doesn't reflect any light. It has become an interesting detail instead of an overbearing focal point.
Here's a close up of the freshly painted wallpaper.
Another look at the new dining room. Now I just need to work on lowering and centering the light fixture, and I think we can call this room done. One more line scratched off my to-do list. Hurrah!
Labels:
before and after,
colors,
dining room,
paint,
wallpaper
Sunday, March 13, 2011
New Fridge!
We've stepped things up in the kitchen. Last week, we went from this:

To this:

Yes, thanks to a little sale at Lowe's and a generous Christmas check from Ma & Pa MJ, we've finally replaced one of our 20+-year-old appliances. This new machine is a Frigidaire Gallery, model LGUI1849L, in white. Its surface is smooth, clean, and bright white (instead of dirty, textured, and dingy), it runs very little, and very quietly when it does.
It may not have all the new bells and whistles like a bottom freezer drawer, French doors, or in-door water dispenser, but it still feels like a serious upgrade to us. And besides, we learned through research before our purchase that some of those new features actually make a refrigerator less efficient. Since this model will use an estimated 335 kilowatts of electricity per year, giving up the doodads for a lower Pepco bill seemed like a pretty good trade to us.
ps -- daffodil sprout count is now at 28. flower buds are appearing!
To this:
Yes, thanks to a little sale at Lowe's and a generous Christmas check from Ma & Pa MJ, we've finally replaced one of our 20+-year-old appliances. This new machine is a Frigidaire Gallery, model LGUI1849L, in white. Its surface is smooth, clean, and bright white (instead of dirty, textured, and dingy), it runs very little, and very quietly when it does.
It may not have all the new bells and whistles like a bottom freezer drawer, French doors, or in-door water dispenser, but it still feels like a serious upgrade to us. And besides, we learned through research before our purchase that some of those new features actually make a refrigerator less efficient. Since this model will use an estimated 335 kilowatts of electricity per year, giving up the doodads for a lower Pepco bill seemed like a pretty good trade to us.
ps -- daffodil sprout count is now at 28. flower buds are appearing!
Monday, November 8, 2010
Porch Projects: Sleeping Porches are Complete (mostly)
When we first saw the Sow's Ear, the little sleeping porches off the back of the house upstairs were being used as storage areas. They contained some cheapy armoires and some clothes rods.


They were cold, dirty little spaces with uneven mismatched floors and mismatched walls (textured wallpaper, vinyl siding, drywall, etc.)

I cleaned up the walls, filled holes, moved out the old armoire that was left behind (it's now our tool cabinet in the basement), and most importantly, put down a new floor. See the difference:


I still need to create some window coverings, but I have a scheme for that to be completed in the next couple of weeks. I'm also planning to have an electrician come out and (I hope!) install an overheard light in the smaller room and an electrical outlet as well. I am hoping to use these spaces to host art exhibitions, in the tradition of the Chicago apartment gallery and French salon. We'll see if I pull that off. For a few days at least, I'm happy to just savor the change.
They were cold, dirty little spaces with uneven mismatched floors and mismatched walls (textured wallpaper, vinyl siding, drywall, etc.)
I cleaned up the walls, filled holes, moved out the old armoire that was left behind (it's now our tool cabinet in the basement), and most importantly, put down a new floor. See the difference:
I still need to create some window coverings, but I have a scheme for that to be completed in the next couple of weeks. I'm also planning to have an electrician come out and (I hope!) install an overheard light in the smaller room and an electrical outlet as well. I am hoping to use these spaces to host art exhibitions, in the tradition of the Chicago apartment gallery and French salon. We'll see if I pull that off. For a few days at least, I'm happy to just savor the change.
Labels:
back porch,
before and after,
electricity,
loveliness,
nastiness,
professionals
Sunday, October 17, 2010
Herbicide
Today, we became plant murderers.
Remember this?

That's what our front garden looked like back in June. It doesn't look so bad there. But over the course of the summer, it kept growing, and growing, and growing. And then it grew some more. The wisteria (vine in the front) almost ate the small Japanese maple, as well as a couple of pedestrians. The hibiscuses (bushes in the back) turned into weedy looking trees.
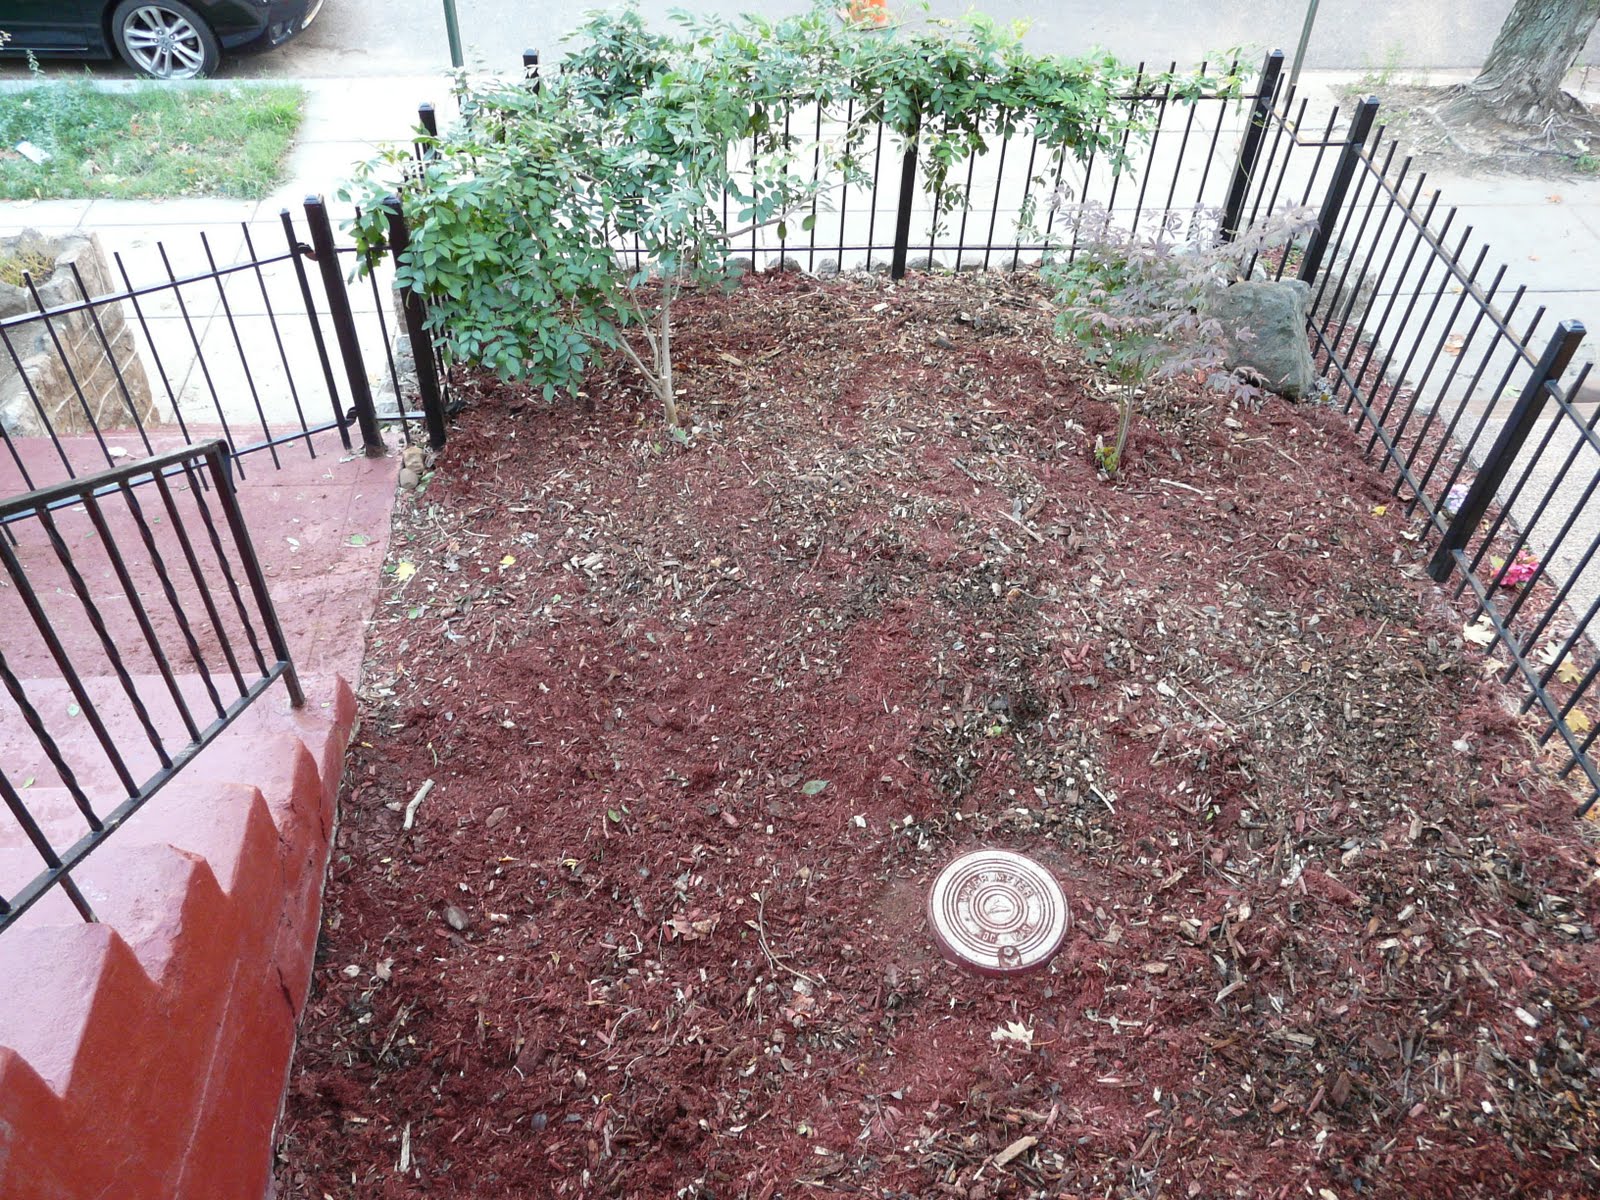
So, after very little planning, 3 hours' steady work, and a trip to the free mulch pile in Takoma Park, MD (31 Oswego Avenue!), we now have this:

Sure, it looks a little bare now, but we're working on a plan for what to do next. For inspiration, I got a sack of daffodil bulbs at the farmers' market. They'll go in the ground soon, and we'll see what happens come spring.
Remember this?
That's what our front garden looked like back in June. It doesn't look so bad there. But over the course of the summer, it kept growing, and growing, and growing. And then it grew some more. The wisteria (vine in the front) almost ate the small Japanese maple, as well as a couple of pedestrians. The hibiscuses (bushes in the back) turned into weedy looking trees.
So, after very little planning, 3 hours' steady work, and a trip to the free mulch pile in Takoma Park, MD (31 Oswego Avenue!), we now have this:
Sure, it looks a little bare now, but we're working on a plan for what to do next. For inspiration, I got a sack of daffodil bulbs at the farmers' market. They'll go in the ground soon, and we'll see what happens come spring.
Tuesday, October 5, 2010
6 Months in the Sow's Ear: A Retrospective, Part 2
Subscribe to:
Posts (Atom)